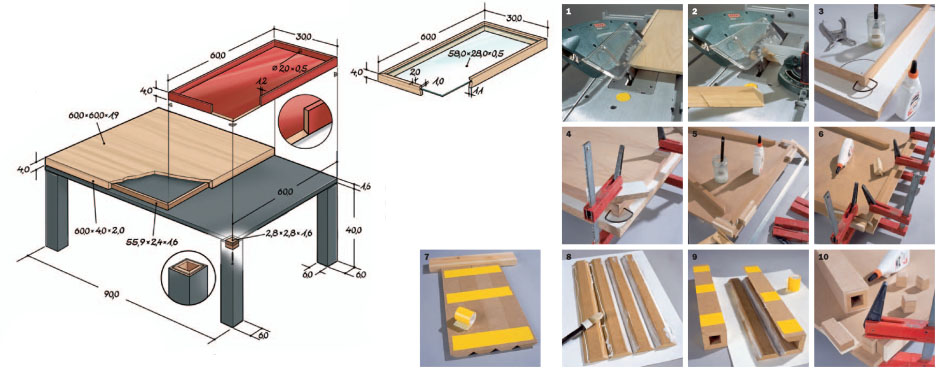
 1 The blockboard with oak veneer, initially to about 62×62 cm cut, gets miter cuts all around on the circular saw, so they are on a scale of exact 60 x 60 cm comes.
2 The oak wood strips for the frame are first sawn to length with an allowance and only then at a 45 degree angle.
3 To glue the frame parts together, lay them on a flat surface (for example coated chipboard). The joined corners must be precise 90 Degrees arise and can be controlled with a square section of plate.
The pressure for gluing the corners can be applied with miter clamps, which are applied with the help of spreader pliers. (After gluing and removing the clamps, fill in the dents with wood paste.)
4 If the miter edges on the frame and table top are evenly coated with glue, the plate is placed on the frame. If you put the clamping allowances under the clamps like this, that they stick out over the edge, at the same time ensure consistency.
5 The base table top has a holding frame made of MDF board strips.
6 The first retaining bar is glued on, the connection strips follow on the left and right. After attaching the fourth bar, the edges are sanded and chamfered. Then try attaching the oak table top. Possibly rework something, if the plate is to function as a compartment lid and be easily removable.
7 Four leg parts each – cut a little too long – are placed close together and fixed on the outside with adhesive tape. Then carefully turn and
8 …evenly coat the connecting surfaces with glue.
9 Roll up the leg parts and press and secure the last glue joint with adhesive tape. After the glue has set, sand the legs, Using the circular saw, cut flush to the exact length at the top and bottom as well as the 3 mm fold all the way around the top (shadow gap) to recover.
10 Blocks made from doubled MDF board 16 mm from the edge glued and screwed – for attaching the legs after painting.
Also completely mitred: the tablet
The tray is built using the same technique as the veneered tabletop. The short frame parts each have a grip hole in the middle on the inside (0 20 x 5 mm). When assembling is again a flat surface (with. B. coated chipboard) necessary, so that the frame parts are glued together (s. under 3 and 4) lay flat.
Made of solid wood and glass: the showcase
The frame parts for the showcase are made from solid oak strips. After cutting, they are put back on the circular saw for grooving. Before gluing, test fit the frame to the glass plate. Only if the groove depth is sufficient, close the mitred corners neatly without a joint.
The best way to achieve high-gloss surfaces on the table frame and tray is with a synthetic resin varnish. To save drying time, can also be used for the primer (slightly diluted) acrylic paint can be used.
what is…? SHADOW JOINT
A creative tool, to emphasize the separation of different components. The narrower a joint is, the more noticeable are irregularities. Therefore it is recommended in many cases, create wider shadow gaps, where there are joints due to the construction anyway.
MITER
The corner connection of two work parts that meet at any angle, which are to be assembled into a frame, for example. Normally, both parts get the same miter angle corresponding to the bisecting line of the corner (for example with a rectangular frame 45 City). Advantage of miter joints: high stability due to large contact surfaces.
BLOCKBOARD
A wood panel, more precisely a plywood, whose middle layer consists of adjacent strips, which are closed off by veneers glued on both sides.
WHERE ARE…?
BLOCKBOARD WITH OAK VENEER: Not normally available in hardware stores. Please ask your wood dealer.