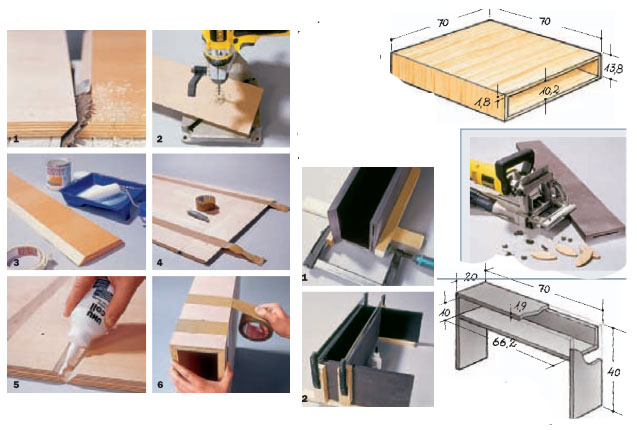
 Version eins: With a particularly large table surface
1 Das Ablagefach besteht aus drei miteinander verdübelten und verleimten MDF-Streifen. The top strip (On the left side of the picture) is mitred:
This gives the finished table a nicer look. When gluing, you should always use wooden supports, to distribute the pressure better.
2 Ist nach etwa 30 minutes the glue firmly, become the side panels, which also have a miter at the top, glued. Again, use allowances and pay attention, that the clamps sit exactly straight.
Worked on miter: The basic module made of birch plywood
The birch plywood in the thickness of 19 mm is now available cut to size in many hardware stores. However, you have to make the 45-degree miter cuts yourself.
1 Fertigen Sie die Gehrung auf einer stationären Kreissäge an, so that nothing blurs and the gluing later fits properly.
2 Bevor der Korpus verleimt wird, still need to drill the holes for the connecting screws (see also page 8) drilled and…
3 …the insides of the entire body are painted. Use a clear acrylic paint and a plastic roller.
4 Ist der Lack trocken, Place the components on a flat surface with the inner side facing down. Then stick two strips of packing tape over it.
5 Nun vorsichtig wenden (best for two) and put glue on one side of each miter.
6 Jetzt wird der Korpus zusammengeklappt und mit dem Paketklebeband stramm auf Zug verklebt. If there are still feet, adhesive strips are also attached here.