 Where it is difficult, to work with profiled boards and panels, with. B. on the ceiling and in the bathroom, special attachments are required.
If the ceiling is clad with wooden profiles, a substructure must be created, as is the case with walls. This is screwed under the ceiling or made as counter battens, so that z. B. a sound insulation can be made. In many old buildings it is possible to equip high rooms with a lower ceiling as part of furnishing them with profiled timber. Are the ceiling joists visible? (possibly. determine with search device), battens are attached to it as a suspension, the false ceiling is mounted on it. Short suspensions are made for normal ceilings, a z.B. To use lights.
Recessed lights and work aids – Should a recessed luminaire be installed, proceed as follows: In the area of the spotlight, first mount two pieces of batten on the substructure on the ceiling. A hole is drilled in the corresponding profile board for cable routing, then attach the board. Before adding more boards, the recessed luminaire is installed. Electrical work may only be carried out by a specialist. Profiled wood tongs make work easier. This means that long boards can also be attached by a single person.
In the case of ceiling lights, additional battens made from leftover pieces are attached, where the lamp is held. Profile wood pliers serve as a board support during assembly. They are clamped to the slats of the substructure.
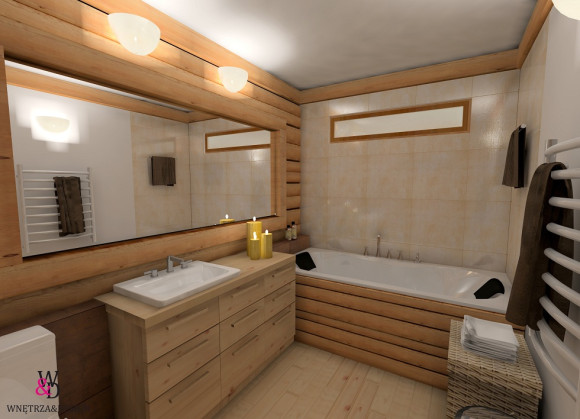
Rear ventilation in the bathroom
In damp rooms, counter battens for ventilating the profiled wood walls are very important. However, counter battens are not required in the ceiling area. The ceiling cladding is provided with a circumferential wall clearance of 5 cm mounted. The wallcovering should be approx. 2 to 3 cm before the ceiling finish. At the end of the floor, the vertical battens should end on the tile base. The bottom crossbar begins 5 cm above, This ensures adequate ventilation from behind.
Mount the sink
In the case of counter battens, a plywood panel should be attached to the substructure for lining in battens thick. It is provided beforehand with carriage bolts to secure the sink. After laying the profiled timber, the washbasin is made with two 2 cm thick spacers underneath and screwed tight. In the case of simple slats, the distance between the slats is matched to the mounting points of the washbasin. Expansion anchors are dowelled at the marking points after the cladding.
Protection from moisture
Before the profiled timber is attached, the lower edges of the boards must be approx. 40 Degree to be undercut (Fig. top right). This allows the splash water to drip off. When laying horizontally, the springs must point upwards, so that no water can enter the groove. The timber profiles are painted on both sides beforehand. An open-pored color is suitable for this, that won't crack or flake, In addition, colors that are harmless to health should be used.
An approx. 6 cm wide board 1 Doweled cm above the edge of the tub (painted dark, like shadow gap). Fill the gap to the edge of the tub with silicone compound. Now the profile boards with a distance of approx. 4 Attach cm to the edge of the bathtub. As a connection to the floor in front of the tub, a lath is attached with assembly adhesive. Between the edge of the tub and the floor there is a 19 mm thick, screwed waterproof plywood board or plasterboard. A layer of tiles forms the base. Notched transverse battens are screwed over them because of the rear ventilation.