 You don't have to leave the installation of a tub to the professionals. It should all be water- and install drain lines, but you can do the expansion of your bathroom yourself.
Installing a bathtub has become very easy these days. Where previously complex lath constructions or bases made of aerated concrete were built, a tub support made of hard foam is set up today. Here the tub is simply inserted and the support is tiled. However, there are not suitable hard foam supports for all tubs. The alternative are tubs on their own feet, which are disguised after alignment. Lightweight boards made of hard foam with a reinforced cement coating are ideal for this (for example Ultrament Do-it-Plate, 6 x 60 x 120 cm about 18 Euro).
1 Vor der Montage der Wanne werden Boden und Wände im Wannenbereich mit einer Abdichtung (mostly latex based, here from Ceresit) painted. If a line is leaking, this prevents major water damage.
2 Die höhenverstellbaren Wannenfüße werden bereits vormontiert geliefert. They are screwed to the reinforced tub floor at marked points.
3 Anschließend montieren Sie die Ab- and overflow set on the tub. Pay attention to this when buying, whether this accessory is included with the tub or has to be purchased separately.
4 Wenn die Wanne aufgestellt und ausgerichtet ist, connect the drain fitting to the drain pipe. Mark the height of the panel (is available as a set for bathtubs), and cut them with cutter or saw.
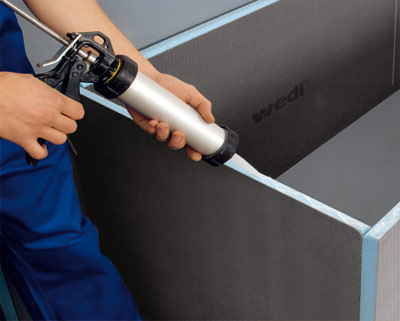
5 Die Platten werden mit aufsteckbaren Verbindungselementen und Montagekleber flächenbündig montiert. To do this, stick them under the edge of the tub and against glued-on panel blocks on the floor.
6 Abschließend versiegeln Sie alle Anschlussugen zur Wand mit Sanitärsilikon. Floor and paneling are sealed with a sealing coat.