 Drawers, Furniture and boxes only acquire a handcrafted charm through the use of a joint. Give it a try – with practice, you can get such great results.
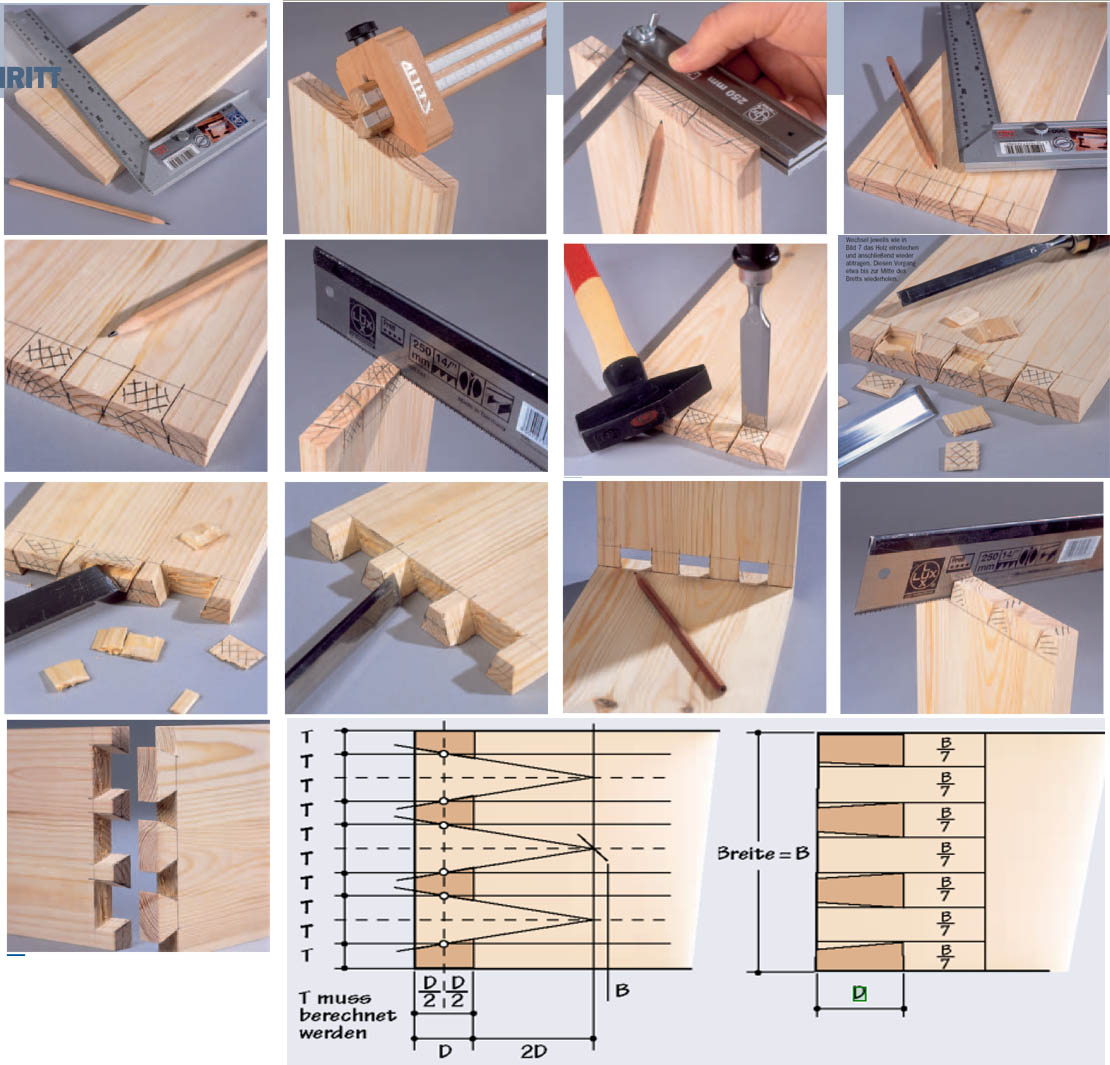
Due to the angled teeth, dovetail connections are both an extremely stable and also optically beautiful wood connection. A decent work result can only be achieved, however, if the greatest care is taken when marking the tines. Please note here, in which direction the connection will be loaded later, because then the decision is made, on which side you scratch the prongs and which side the dovetail. For example, you should place the dovetail pieces on the side of a drawer, otherwise they could easily be pulled off from the front due to the tensile load. Arranged laterally, they wedge together and are highly resilient. The division of tines and dovetails is determined according to the calculation scheme and depends on the board thickness and width.
1 With a carpenter's square and a pencil, draw the board thickness on both sides of the end of the first workpiece.
2. The center line of the board is marked with a mark. If you don't have one, the crack is executed with the angle.
3. The calculated tine spacing (see box) Transfer to the center line and mark the prongs determined using a bevel.
4. Now with a carpenter's square and a pencil, the prongs on both sides of the board up to the pencil crack (Brettdicke) complete.
5. Mark the parts, you want to saw out clearly and leave the pencil cracks when sawing out the prongs.
6. The prongs are sawed out with a precision saw. For this activity, clamp the board firmly or in a workbench.
7. With a chisel as sharp as possible, the piece to be removed is first roughly 1 to 2 pierced mm deep.
8. Carefully remove layer by layer with the chisel. Always right and left alternating as shown in the picture 7 Pierce the wood and then remove it again. Repeat this process up to about the middle of the board.
9. Turn the board over and do the same work from the other side, so that the wood does not tear on the visible side.
10. Unclean areas, be it from sawing or parting, are carefully cleaned with the chisel.
11. With the help of the finished piece of tine, use a pencil to mark the dovetails on the second board.
12. The dovetails are sawed in the middle of the crack with a precision saw and, like the prongs, cut out with a chisel.
13. The finished dovetail joint can now be put together and permanently connected with a little wood glue.
CALCULATION OF TINES AND DOVETAILS
The variant on the left is halfway across the board thickness (D) outlined a center line. Another auxiliary line at a distance of 3x D is then required to mark the triangles. The number of dovetails is calculated according to formula B. (width): 3xV2D calculated. The result is rounded off to an even number and the number of tines added (= Number of dovetails 0+1). In the second variant, the width is divided by an odd number, so that the division corresponds approximately to the wood thickness. From the graduation marks, the self-made stencil bevel shown must then be removed to the outside.