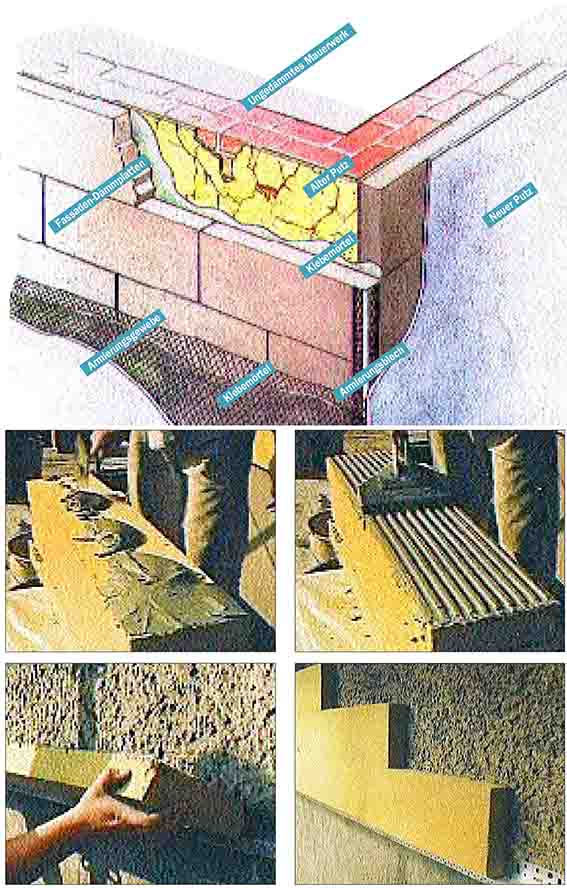
This drawing shows the correct structure of a facade in the thermal insulation composite system. The plaster base lamellas are glued together without dowels. The reinforcement and the plaster ensure a solid outer skin.
 This is how plaster base lamellas are glued.
A mineral adhesive mortar, thickly mixed with water, is applied to the back of the plaster base lamella with a trowel.
The adhesive mortar can be distributed evenly with a very coarse notched trowel. Put the excess mortar back into the bucket.
The first plaster base lamella is placed in the profile of the end rail. The back to the old ones, press load-bearing facade plaster.
Glued together: A layer of plaster base lamellas is lined up or. to the next, until the facade surface is completely covered.
Although the purely manual process of gluing the stone wool plaster base lamellae seems child's play: If you have the intention, to subsequently insulate and replaster your own house facade, you should never attempt this alone, but only in direct cooperation with a specialist. The right contact person for professional advice, which includes a tour of the house, would be painter, plasterer or master mason. Ask beforehand, whether the companies have experience in the processing of thermal insulation composite systems and stone wool plaster carrier lamellae and whether they are prepared for a kind of division of labor between specialists and hobby craftsmen. You, the client, commit yourself, to obtain all the material from the master craftsman (it is only offered by so-called system holders anyway, companies, the both with the insulating material, the glue, the reinforcement and the matching plaster). And in return, the master craftsman assures you of specialist advice and instruction in the working technique. Both parties benefit from such cooperation: The Craft Master earns by reselling the material, and you win by it, that you simple, but you can do the time-consuming work yourself and save money.
When it starts, many small questions arise, this also applies to the installation of a thermal insulation composite system. Do you have to pre-treat the substrate?? What should be considered with the expansion joints? How are corners, Take us, Wall projections treated? Which areas of the facade are considered vulnerable to impact? The specialist knows an answer to all questions. And you would be ill advised, if you didn't do a lot of research before starting the practical work. This begins and continues with the selection of the necessary tools, to be shown as many tricks as possible for the best processing of the material. Remember that too, that you certainly need scaffolding, so you can work quickly and effectively. Even if you should be very skilled with your hands: It is better to delegate the cleaning of the facade to your cooperation partner from the outset. Your house would certainly be too good to be a test object!
The new facade: incombustible, optimally insulated and highly diffusible.
 A reinforcement fabric makes the outer skin firm:
The edges of the plaster base lamellae are reinforced with angle profiles: at the window- and door reveals as well as the corners of the building.
The fiberglass fabric is bonded with pasty adhesive mortar, that lies under the angle rail, smoothed over with a smoothing trowel.
The wall surfaces are provided with glue, when the soffits have dried. The adhesive mortar is applied with a wide smoothing trowel.
The fiberglass fabric, previously cut to length, is embedded in the fresh adhesive with an overlap. Press from the middle.
When reworking the wall with a smaller trowel, the fabric is embedded in the adhesive across the surface. Proceed like this line by line.
The final coating of the facade with a mineral plaster should only be applied to closed areas. This is where the expert comes in!
The plaster is applied to the wall with a stainless steel trowel. The thickness corresponds to the grain size of the material used.
Rubbing with a plastic float is the last step on the plaster of the new facade. This step gives the still fresh top coat its final structure. Finally, a single leveling coat follows.