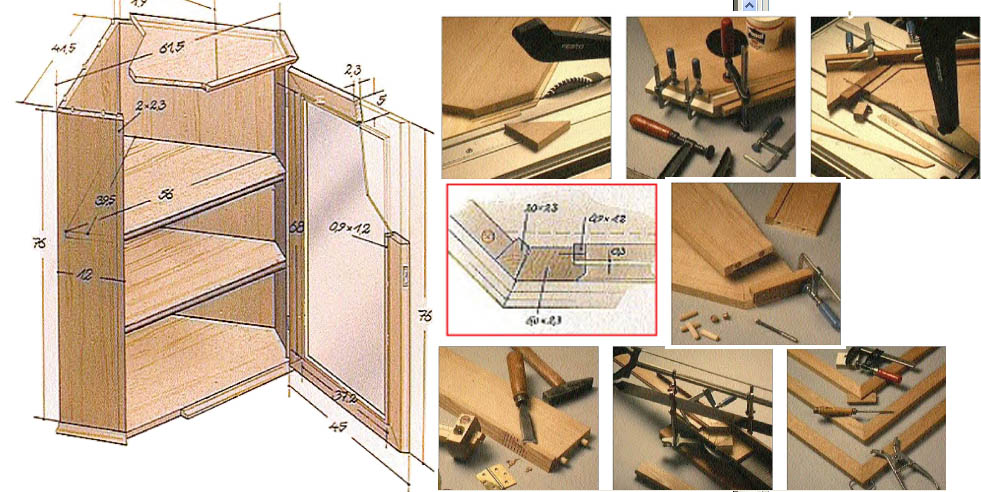
 Even if the small wall cabinet is not particularly complicated: If you want to recreate it perfectly, you should keep a few tricks in mind. The veneer of the blockboard is sensitive. Therefore, you should always use a thin sheet of plywood when cutting to size, so that no material splinteres there. The auxiliary stop is also used to prevent wood chips from splitting, you in the photo 3 recognize.
Now to the gluing to Ober- and subfloor. The front corners of the panels cut according to the parts list are cut off at a 45-degree angle on the table saw, leaving a straight leading edge of 44,8 cm arises. Use the adjustable miter saw to bevel the edges of the edging strips.
1 in the angle of 45 Grad will be the little ones, front corners of the rectangular top- and sub-floor sawn off. Underlay thin plywood!
2 The short edge bands are clamped to a coated board. Glue the long strip flush, saw off the big corners.
3 Be circumcised Ober- and subfloor, after the short strips are glued. Provide cross stop with a stop bracket.
4 The front edge of the cabinet side panel is aligned with the butt joint of the edge band. A stop bar specifies the distance.
5 insert tapes, that's first, after the edge band of the side part has been cut to bevel.
6 A clean miter cut succeeds in the door frame strips, if you put the saw fence with auxiliary bars behind- and lined.
7 Frame construction in three steps: Glue the mitres first, cut the tip with a circular saw, cut out. Then glue in a feather.
The most important dimensions for the cabinet can be found on the drawing on the left.
The field framed in red shows in detail, what the front corner of the cabinet with the door stop looks like. You can find the cutting dimensions in the parts list.