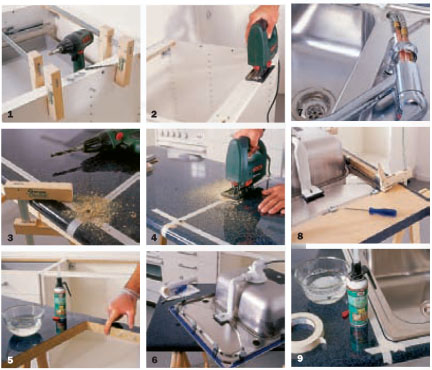
 In the first step of our kitchen redesign, the one that was much too large flew, old sink out and the existing kitchen base cabinet was supplemented by two new colleagues: one as a new sink cabinet and one for the previously unused niche. Important: All cabinets should be the same height, so that the new worktop has a level surface when you start work. Unless a new stove is planned, you can easily integrate the old one (see tip).
The plastic-coated worktop itself is from the hardware store. Get them cut to length right there, it's easy to go wrong on your own. Make the sink cutout on the top of the worktop. The jigsaw blade runs very strongly through the panel thickness and increases the sink cut-out dimensions by several millimetres, when sawing on the underside. Keep this in mind when purchasing a sink, that the hole for the mixer tap is already in it - self-tapping is only possible with a special tool.
1 Die Unterschränke verschrauben Sie miteinander, through the side walls. Clamps keep the cabinets aligned.
2 Zum Einsetzen der Spüle klinken Sie die Querleisten des Unterschranks aus. Take the measurements from the fully assembled sink.
3 Die Umrisse des Ausschnitts zeichnen Sie auf ein auf die Oberseite der Arbeitsplatte geklebtes Kreppband. Pre-drill the corner points with a 10 mm drill bit.
4 Mit der Stichsäge sägen Sie von Loch zu Loch entlang dem Bleistiftriss. Clamp the cutting piece in place before the final cut, so it doesn't break out.
5 Alle Schnittkanten müssen Sie sorgfältigst mit Silikon versiegeln. Use dish soap and gloves to spread.
6 Bevor Sie die Spüle einsetzen, install the drain fitting…
7 …and the sink faucet.
8 Setzen Sie die Spüle ein, position and fix them, turn the countertop over and tighten the sink retaining claws (never with a cordless screwdriver!).
9 Den Übergang von Spüle zu Arbeitsplatte versiegeln Sie ebenfalls mit Silikon.
10 Für die seitlichen Schnittkanten der Arbeitsplatte gibt es im Baumarkt passende Umleimer. Just iron on (Iron on medium setting or "cotton"), press firmly with a wooden block, Knock off the excess with a sharp chisel and lightly sand the edges with fine sandpaper.
11 Die Verbindung der Arbeitsplatte mit den Unterschränken erfolgt durch Schrauben, which you place through the crossbars of the cupboards into the worktop. Temporarily force both together beforehand.
12 Ist der Fliesenschild hinter der Arbeitsplatte gerade und fluchtgerecht, seal the transition with a silicone joint. It will be cleaner, if you mask the plate and tiles with adhesive tape beforehand.
13 Ist der Fliesenschild uneben, so that a silicone joint would be too wide, use suitable end strips from the hardware store. Adhesive tapes won't hold up on uneven walls, only dowels and screws.
The working height of old stoves is 85 cm, the modern kitchens 90 cm. You can even out this difference with a piece of countertop (4 cm) under the stove. Before felt gliders (1 cm) glue under the plate. A plinth cover later covers everything.
Two additional base cabinets ("Honest" von Ikea) von 50 and 60 cm width was enough, to increase the scope and work surface of the kitchen.
Would you prefer to install one made of solid beech wood instead of the melamine-coated worktop?, so you have to do something in terms of your fitness for use. surface (Don't forget the bottom!) and cut edges in particular should be treated generously and several times with a hard-wearing oil. This means, You need to paint all the wood with the oil, es 10 allow to soak in minutes, Massage in excess with a linen cloth and sand down with fine steel wool after drying. Repeat this process at least twice, on the sink plate three times. You should still seal the cut edges of the sink cut-out with silicone. Oil has the advantage, that you water- or other stains can be partially sanded out. Painted surfaces can only be touched up as a whole.