 MDF panels: Process surfaces – An ideal material for the perfect finish.
This material offers surfaces and edges, as the colander wishes for an optimal painting. Almost all means are used on MDF.
The crowning glory of successful DIY work is the perfectly painted surface of the material. The specialist says finish. The surfaces of most furniture panels, however, require a lot of filling and sanding, to create the right surface for a flawless paint job. The structure of the chipboard, the grain of wood veneer and unevenness in primed panels make preparatory work necessary.
Chamfered and softly rounded edges, Decorative millings on the surfaces and doubling for the base and gable roof: These are the typical characteristics of furniture made of MDF. The perfect surface treatment succeeds straight away with this material.
Even with MDF, you can't do without sanding. Sanding fleece or a sanding sponge are ideal for profiled edges or millings on the surface.
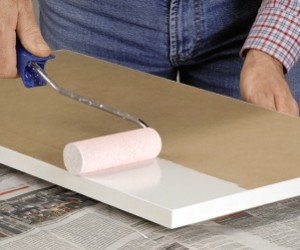
Priming is important. The porous material sucks strongly, therefore apply the primer generously. Place small pieces on a nail board to dry.
The edges in particular soak up any liquid. Fast drying primer enables several coats in short time intervals.
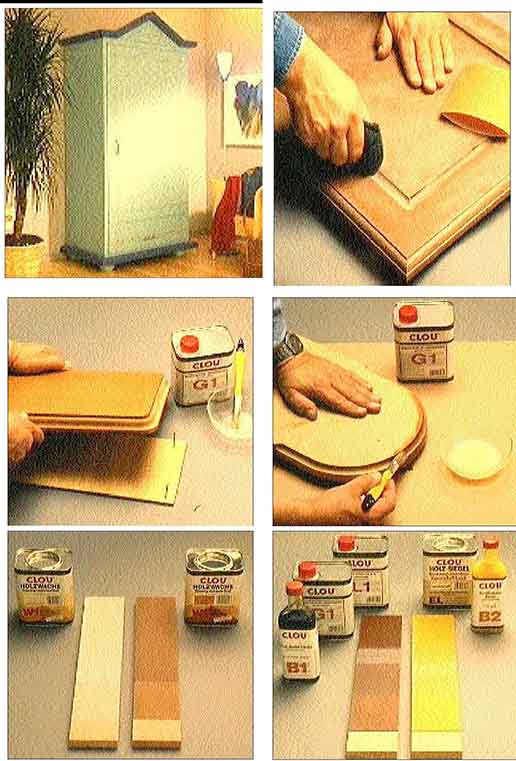
Wood waxes, colored in colorless or light brown, give the surface a buff-colored appearance, that can be polished to a silk gloss.
With normal pickling, wood-colored or colorful, MDF board can be colored. Then prime and treat with nitro lacquer or sealant.
It is different with the surface of the MDF board (Medium density fibreboard). The super fine wood fibers, which in this panel are pressed together with glue resins under high pressure to form a dense mass, form a velvety soft, absolutely flat surface without structure and stripes.
The same is true of the edges. Finely ground after sawing or machined with milling cutters, they can be painted without filling. Milling on the surface as well, like indicated cassettes on doors, engraved ornaments or other decorative millings, can be treated directly with surface material after fine grinding.
Preparations for painting
The large surfaces of the MDF board are actually painted by default- or. paintable. But they can still use a fine polish. Because skin oils you can touch, Contamination from tools being deposited, Traces of glue and dust from the air can affect the adhesion of paints and also leave a paint surface that is not completely flat. It is sanded using a cork or block with fine sandpaper (360he grit). Sanding dust is carefully removed with a brush or, better, by vacuuming with a powerful vacuum cleaner.
swing- or eccentric sanders are also suitable. Here, too, use fine sandpaper and be sure to connect the machine to a suction device.
The edges also have to be prepared a little. Traces of the saw blade or of milling cutters are ground flat with the help of a sanding block, Profiles processed with abrasive fleece or a sanding sponge, until all traces of processing have disappeared.
Priming and finishing
Because MDF boards have a highly absorbent surface, Any paint applied would immediately sink into the material and not form a closed surface. Priming and thus sealing off the surface with a suitable primer is therefore absolutely recommended. In the case of colorless treatment, it can be a base or paint thinned with solvent. Because the edges suck a little more than the surfaces, the primer should be applied more and more thickly and calmly here. In the case of water-based paints, of course, water is also used to dilute.
Pretreatment is also necessary for pigmented paints. Should the last coat be done with high-gloss varnish based on synthetic resin, is cordoned off with wood protection primer, then white or colored primer paint is applied and finally painted.
Should the material be given a satin finish, the paint is built up in a similar way. For a top coat with water-based acrylic varnish, a wood protection primer is used, repainted with water-based primer and then painted matt or silk matt. You can use a brush or Moltoprene to apply the colors- or. short pile mohair roll. With appropriate dilution, all of the paints and varnishes mentioned can also be applied with a spray gun.
This is how you get an optimal paint job
The last coat of paint determines the quality of the paintwork. Sand finely after each intermediate coat and carefully remove the sanding dust. Only work in a dust-free environment. Paint surfaces as horizontally as possible. First paint the edges, then apply the varnish generously to the surface, in the opposite direction, sell and simplify. Repaint the edges. Vertical surfaces are less saturated and better to paint twice, so that no leaks form. Leave the room immediately after painting and avoid creating dust. Allow enough time to dry.
Coating structure for synthetic resin lacquer with a silk-gloss surface: Wood protection primer, Undercoat color, Lack.
Resin-based matt: Wood protection primer, Speziallack Twenty 123 + Matt paint or undercoat paint and spray paint.
High-gloss synthetic resin paint: Wood protection primer, Primer color in white or colored, High gloss lacquer.
Water-based silk gloss varnish: Wood protection primer, Acrylic primer paint in white or colored, Acryllack.
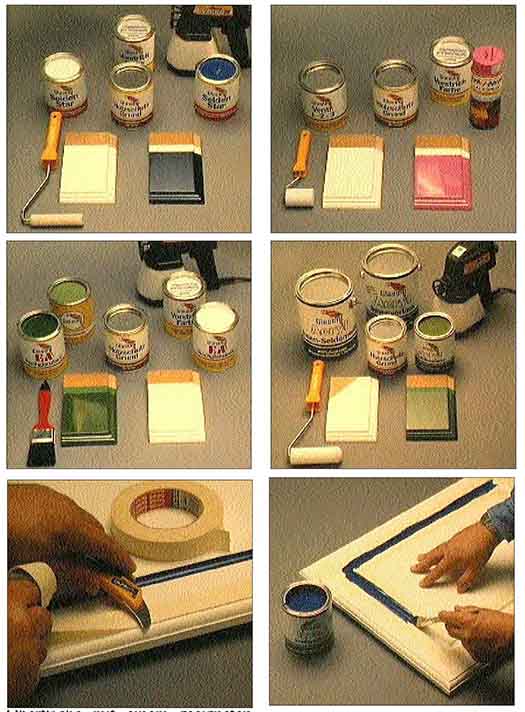
If there are paint shocks, masking must be carried out. Stretch the tape slightly, Glue on and press the edges firmly.
First the bright one, then paint the dark color. Then immediately peel the tape sideways away from the paint.