 Think about the location before building.
When building and operating the weather station, three aspects are important: On the one hand, the house must be solidly constructed. After all, it must not be blown over by the first gust of wind, and it is designed to ensure accurate data even under adverse weather conditions. This is ensured by the robust materials and solid construction. Second, it must be equipped with reliable instruments (in our case we are dealing with devices for measuring temperature, humidity, air pressure, wind speed and precipitation). Thirdly, so that the efforts to collect the data do not remain in vain, there must be a suitable place outdoors for the weather station. This means: The weather station should not be shielded by mighty treetops, do not stand in the immediate vicinity of buildings, since their heat radiation would falsify the data, and it should not be sheltered from the wind by a wall or hedge.
Book tips on the subject of weather.
For now, the band makes cloud pictures, weather forecast, a paperback from the “BLV Naturführer” series, familiar with what is happening in the atmosphere. The title PC weather station from the elektor publishing house is ideal for technology enthusiasts, a guide to computer-aided weather data processing, which can be fed with the values of our measuring station
The Barograph, which measures the humidity and records the data, stands on a pedestal. The other measurements- or. Display instruments are combined in a dashboard.
down to earth: Depending on the location, ground spikes or post bases are available for screwing onto paving slabs or slabs. for anchoring in concrete foundations.
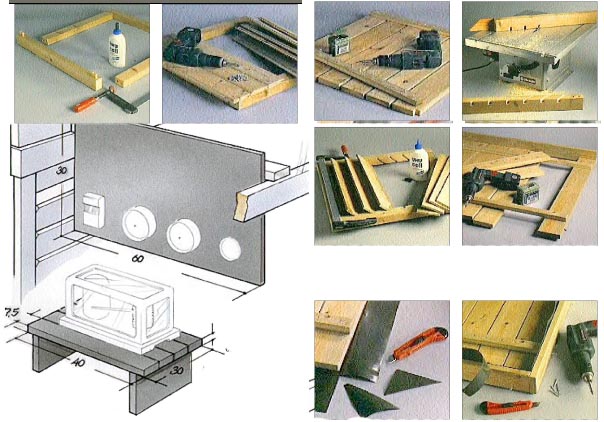
5. The frame for the back wall consists of slats (cross-section: 3,5 x 5,3 cm). With wooden dowels (8 mm) and put white glue together.
6. Auf den Rahmen werden Bretter aufgeschraubt, which have tongue and groove. This can be done in no time with a cordless screwdriver.
7. The floor: The boards (cross-section 2 x 9,5 cm) are spaced from 0,5 cm and screwed to two crossbars.
8. Damit die Lamellen in den Türen Halt finden, diagonal double cuts are made with the circular saw (15 degree oblique, 1 cm wide).
9. The slats (1 cm wide boards) are inserted into the slots coated with white glue and pressed with clamps until they harden.
10. Boards form the roof surface 2 x 9,5 cm cross section. A bezel comes out all around 7 x 2 cm thick wood (just adjust).
11. Die Dachfläche wird auf Teichfolie gelegt. Cut the corners with a cutter and fold over the excess inside.
12. The aperture (in picture 10 only adjusted) clamps the film and is in turn screwed to the roof. Cut off the leftover foil with a cutter